Saturday, December 24, 2011

Works in progress!


Latest Metal Sculptures

These two wonderfull pieces are the latest to be completed and posted in my Etsy Shop .  The first is a mix of a self portrait and a just an excuse to use up some excess cutoff pieces. The other is a more ambitous piece that I have been continously added to to give it the right mix of shapes and designs.  I still might need to weld mounting brackets on this as it is fairly heavy.   Below is the face with a coat of Rustoleum primer.


Pink heart Candle Holders


Heart Candle Holders

These where I gift I made for my stepmother.  She loved them and they went perfectly in the guest bathroom.  I have found these easy to make.  It is a matter of  using plumbing fixtures as bending jigs along with a little leverage of coarse.

Friday, December 9, 2011

My New Lenses on Squidoo

In the past 2 days I have been busy creating lenses based on my Etsy Shop and based on my unique technique of creating modified finishes on metals with mica powders.  The main lense about my Etsy Shop is called The Metal Art I Weld in Various Styles  and the mica powdered lense can found at this link, mica-powders-in-arts-and-crafts .

Monday, November 28, 2011

Followup to Great find for an upcylcer


Art Nouveau Wall Art completed

As you might have read in my previous post on found art , I found this wonderfull scroll form in the garbage and knew right then that greater things where in the future for this composition.  I ordered the steel flowers from King Architectural Metals, welded them on with some other accents and gave them a super bright and reflective iridescent finish in several vibrant colors.  Here is closeups of some of the accents.


This wonderfull piece with its bright metallic colors is listed at my Etsy shop as art-nouveau iridescent floral metal wall art .  Hurry its at a good price with free shipping to the continental US!


Friday, November 25, 2011

ETSY Coupon code!

Fifteen perccent off all purchase from my etsy shop until December 31st, 2011!   Just visit www.etsy.com/shop/jtbmetaldesigns and enter the code below:


The online coupon code is DECART11.

ALWAYS FREE SHIPPING TO THE CONTINENTAL US

Tuesday, November 15, 2011

Great find for an upcycler


Dumpster diving for art

While taking out the trash, I noticed a rather ornate metal curl.  On further inspection, I pulled this beauty out of the trash.  Yes, it was IN THE TRASH!  It is about 33 inches across and made of what appears to be 1/8 inch rods.  Undoubtably this was probably part of someones decor that someone got bored of.  This happens alot with these drab souless Asian import pieces that floor our furniture stores and big box strores.


Aquiring accents and surface preparation

Did not take me long to figure out what to do with my find to make a respectable piece of wall art.  Without delay, I ordered some steel flowers from King Architectural Metals which has the best selection of decorative metals by far at the right prices.  You can the ones I got in the first photo above.  Next, I took the grinder and ground the paint off the areas I wished to weld the flowers on as well as a spot to attach my ground connection for my welder shown in the second picture.


As you might have guessed, the five flowers I welded on make a world of difference.  I am now considering some spheracle accents to imitate fruit or berries to bring more vibrance to this piece. I
will write a follow up blog to let you know what happens. 


Wednesday, October 26, 2011

Mid Century Metal Wall Art Brazed Nails


Hey just wanted to let you know I listed a new item on Esty. CLick the link below:
Mid Century Abstract Nail Art

Follow up to Martha Stewarts Metallic paints

 
Simulated candy paints
I know you are all waiting with bated breath since my last post "Martha Stewart Metallic Paints"  so here is my completed garden stake with 3 ccoats of Rustoleum Clear for protection.  I am really pleased with the results.  With the Krylon X-metal transparent colors, the Martha Stewart Living Metallic paints, more specifically the polished silver one, make an admirable water based silver base coat for spray can simulated candy paints. This item Floral Garden Stake is available at my Etsy Shop  . Have a closer look:
 

Martha Stewart Metallic Paint

 
Martha Stewart Living-Metallic Paint
 
I was at Home Depot the other day looking at flooring when I remembered I needed somespray paint.  I happened to notice a new display in the paint section.  There, they had all these latex specialty paints.  The ones that caught my eye the most was the metallics.  I already have been using the Folk art Metallics on many of my projects.  Although water based, I always apply a solvent based lacquer for protection. 
 
The Martha Stewart Metallics are like $5 to $8 for a 10 ounce jar so I figured I at least should try.  I picked the polished silver since I need a light colored silver undercoat for my X-metal paints.  With a silver reflective base and a transparent paint,  you get something resembling a candy paint as in my most recent artwork Pisces
 
 
Here is a garden stake I am working on.  I applied two coats of the Martha Stewart Polished silver
and it turned out pretty decent.  The real test will be when some transparent paint is applied over this.
 

Friday, October 21, 2011

Nuts and Bolts in Metal art

Nuts and bolts in metal art


Found this page while searching for welded art. I have seen a few artists use the technique of welding various nuts, bolts, and hardware to create a believable animal or character. Here is some pictures of this artform.

Gun Bluing As an Art Medium

Gun Bluing as an art medium


Recently, I arc welded an abstract candle holder for personal use. After a good pickling and a thorough wire brushing, I was genuinly pleased with the appearance of the shiny steel. I then remembered that a few months before I has purchased a liter of Birchwood casey Super Blue on ebay. It was $60 which I thought was rather steep until I realized how concentrated it really was. The active ingredients are selenium dioxide and copper nitrate. These are potent oxidizers as well as being quite toxic. Great care must be taken when working with this material. Straight out of the bottle, this solution blackens steel immediately so if you are looking for more of a blue-gray, you will need to dilute with water considerably. I noticed during application that there was somr sudsing which means that they included a small portion of surfactant to the formula to improve its abililty to wet the metal surface. Also, when the satisfactory finish is obtained it is imperative that you flush the area with copius amounts of cold water and you dry completely. If not, the remnants will settle within the nooks and crannies creating unsightly rust spots. A heat gun on low would be helpfull here.
Here are some more photos of that candle holder.
You might not be able to tell from the photos but I applied a spray solvent based lacquer which
brought out a handsome shine to the deep patina. Next installment, I will try to get a lighter colored finish.

Mica powders in arts and craft

Mica powders in arts and craft


What are Mica PowdersIn this artical, I will discuss mica powders as inorganic pigments. More specifically, I will refer to there addition to paint mediums and coatings and applying them as metal finishes. Usually, a specific color of mica is made by grinding a natural mica to a specified partical size and then applying various inorganic additives that create the desired color by creating and interference layer. The light strikes the modified mica and bends creating the color needed. This is very simular phenominon that you will find in a parking lot where oil and water meet. For a more technical essay on this topic click on this article about polarization and interference colors. A good place to buy micas is cosmetic and soap maker suppliers and these are the largest nonindustrial consumers of these pigments.
How my use of micas differs
Most crafters just use mica powders for scrap booking, embossing, or perhaps for precious metal clays. This link is a typical example of these uses and does link to related articles. What I am offering here is a truly unique perspective on using mica in art. One I will talk about the adding the mica to a clear painting medium and two I will relate this to applying a painted finish on metal art. In this article I will talk my experience with a water based acrylic medium. More specifically, the 3D crystal lacquer made by Sakura craft . This seems to be most preferred 3D lacquer for crafters. It is water based acrylic that is thick and dries especially shiny. More on acrylic paints can be found here . All water based acrylics are opaque but dry clear as the water evaporates. This is because water based acrylic paint is an emulsion. Later, I will write about adding micas to oil based mediums.
An Application example
The pictures I am adding show two candle holders my wife asked me to repaint for her. We paid $2.99 for them at Goodwill and they where cheap steel artifacts mass produced in China that had the most hideous fake brass paint on them. This was chipping off so I used my steel bristle brush to finish off the coating. I applied Rustoleum white primer and flat black spray paint. The black finish was to be my canvas to which I would work. Since these works are our personal use, this was an experiment in technique and a learning experience. I learned that you need very little pigment for a given volume of medium. Especially if you are using the special interference micas that appear white but have coatings that change color on light angle. Too much of these leaves the finish very frosty looking. I had this problem with the moon holder and I used hot soap water to strip down back to the black finish. As you can see using cautions in mixing works very well.
This particular finish was a deep blue metallic blue with a light coating of interference purple.
This gave the moon a peculiar blue violet look which I feel the real moon possesses. Look how I did the sun one.
This has two interference coatings. One is copper interference and a slight accent with red interference on the rays. Here is what they look like together.
The gold and silver finishes are yet another technique using waterbased acrylics. This will be covered in an other installment.

**UPDATE** Just want to inform those still reading that I have created a a squidoo lens about Mica powders in art and crafts based on this blog entry and will be adding more content to it in the future so be sure to check it frequently.

First Attempt at cutting torch

First attempt at a cutting torch


Use of OxyAcetylene Cutting Torch
After some consideration I decided to try to use the cutting head on my torch. It only came with one tip and that was for cutting half inch to inch thick steel which is part of the problem with the cutt shown above. The other problem was I had the pressure set at 40 psi for the oxygen which was probably too high. I have since ordered some other tips for use on thinner metal. I will also use a few pressure settings on the O2 to fine tune the cutting process. I do not think this will be too hard to master.

First Attempt at a Rust Patina on Steel

First attempt at rust patina


Back in September after a summer of practing both oxyacetylene welding and arc welding on a certain collection of steel I had quite an assemblage. This may or may not be a viable way for me to express my creativity. As you may see, I attempted a rust finish on the steel to give a more "rustic" look. Pun intended.
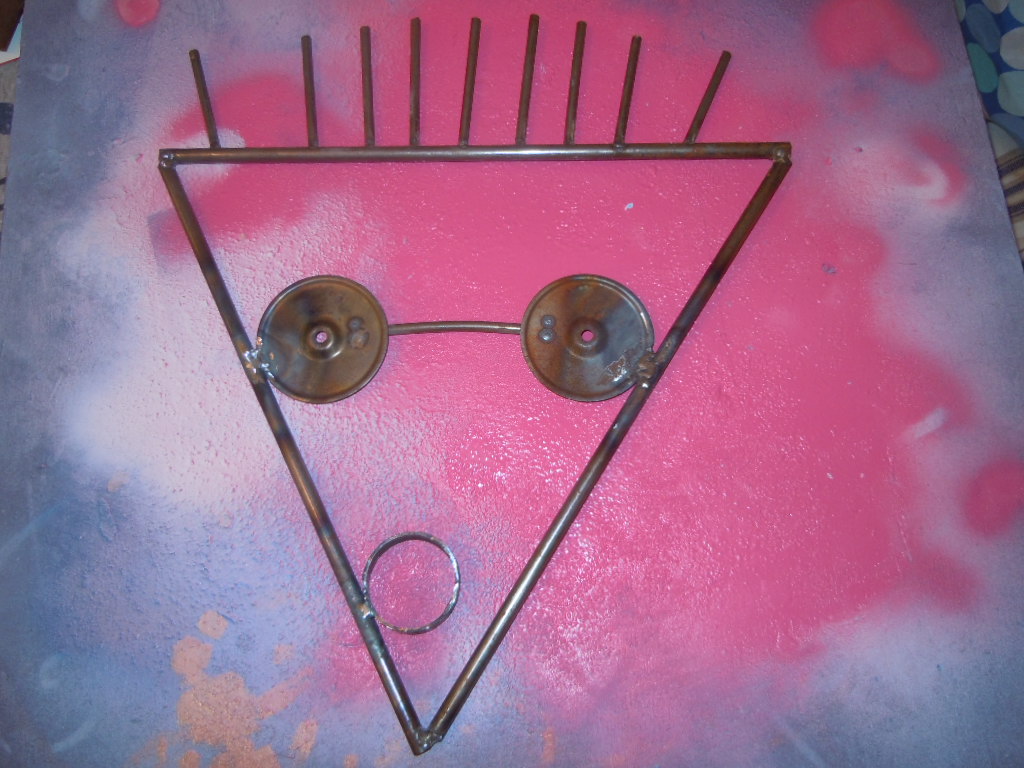
. It was a simple affair of just using concentrated salt water and the heat and energy from the sun. It just so happened that this September was a partiucular dry and hot one as we broke many weather records involving both drought and excessive heat. The day this photo was shot was actually the 4th day of autumn (Sept. 25) and it was a hot and windy 95! This kind of heat is very helpfull when rusting steel, providing you have moisture and an electrolyte. This was OK as a rust promoter but the rust covering was very uneven. It had to be wire brushed and reapplied several times. After some research online via searches and consulations with metal forums, I concluded there faster and more satisfactory ways to form even rust. Two ideas that seem the most promising, is drugstore peroxide mixed with vinegar and a pinch of salt, and the other is drugstore peroxide mixed with equal portion of Clorox bleach. Both involve very active oxidizers and would rust mild steel very quickly. These will be covered in further writings. Here is a closer shot of the rusted assemblage.

Another Rust Patina Formula

Another rust patina formula for steel art


In an earlier post I talked about applying a rust patina with strong salt water and alot of very warm sun. Problem with this formula is that it is slow, the coverage is uneven, and well its hard to get warm sun in February! So, after some searching online, I found this instructable on rust patina. It is a quality instructable that guides you in the process in every conceivable way. The formula can be adjusted in proportions and the affects are immediate!
And behold I have created a patina solution that will literly rust metal before your eyes! It is cheap as it will cost you $1.25 not including the spray bottle, it is completely safe and biodegradable. You just don't want to drink it because it does contain peroxide. I mixed one teaspoong of seasalt(rock salt works) with about 7 to 8 ounces of vinegar and added freshly purchased 16 ounces of hydrogen peroxide. The peroxide should be mixed up and used as soon as possible after purchase as it does deteriorate with age. Keep your mixed solution in a dark opaque bottle in cool dark areas.
I needed a spray bottle to ensure that the rust solution would be applied evenly. Now most spray bottles have steel springs in the pump mechanism and hence would not be suitable for use with aggresive solutions like our perxode rusting solution. So, we need a spray bottle with all plastic parts and the Spraymaster serves this purpose admirably. Now it cost $6 to $10 depending where you buy it. I got mine at US Plastics but I am sure I have seen it at home improvement stores as well.
Now as far as the solution performance I was ASTOUNDED at is instanteous action! The steel was literly rusting before my eyes. After removing the original rust patina with muriatic acid on the workpiece, I hung the art with a hook and spray my solution on it. It was completely red after 5 minutes. I applied another coat like 3 hours later to be sure and let it dry overnight. Here is what I saw.
Talk about complete coverage this is great! It almost has a gloss finish to boot! I am going to apply an oil based finish and I will talk about that in a later post.

Issues working with brass

About brass and what it does for metal art
In metal art one of the coolest metals to work with is brass. It has a golden color and is stronger than copper yet melts or softens at a somewhat lower temperature. The golden color does darken with time but this easily remedied with copper/brass polishes. Brass is a copper/zinc alloy that has other metals added to contribute specific properties to the alloy depending on its end use. There are over 400 brass alloys in use. The most common brass available is 260 cartridge brass. This is called this since it is used for casings on ammunition. It is the cheapest brass and has a brilliant yellow color when clean and polished.
Challenges in Torch Braze/Welding of Brass
One problem I encountered early on in my artist endeavors was trying to brazing brass to steel or to brass for that matter with ordinary bronze brazing rod. Problem with this is your common brass has a melting point approximately the same as your brazing rod. That is somewhere in the 1700 to 1800 fahrenheit neighborhood. Another peculiarity about heating brass is that it does not "flow" or liquify like bronze, silver or iron for that matter. At bright red heat it oxidizes extensively and gets a coating of black,green, and brown oxides. Whats more, is that if you are not diligent when heating the brass, after the oxidizing begins the metal will either collapse into a puddle or shrivel into a hideous form simular to what aluminum does. Another dilema is that you may inadvertly burn a hole in the brass if it is a relatively thin plate or sheet metal.
Types of brazing alloys for brass
One solution would be to use ample supply of flux to dissolve away oxides as they form. But a better and simpler solution is to use a brazing or soldering alloy at lower temperatures. Ideally, one would use one of the quality silver bearing brazing alloys yet these are prohibitively expensive for most artists.
An inespensive alternative is copper/phosphorus brazing alloys. These melt at about 1300 fahrenheit and the joints are stronger than the parent metals. There is one caveat of coarse. That is you cannot use them with ferrous alloys. The reason being the phosphorous from the brazing alloy will form extremely brittle phosphides with the iron possibly causing joint failure. One way to get around this is to braze "copper coupons" to the steel and use the copper/phosphorus rods to braze the copper to the brass. This mainly applies to joining brass sheet to steel sheet or rod or vise/versa where the copper joining is hidden. If you wish to join brass rod to a steel rod where the joint will be clearly visible from all angles then soldering with lead/tin solder might be the best bet. More on this later.

How to hide a weld

How to weld from behind
When making metal art, furnuture, or decor; there will be numerous occasions when you want to permanantely attach a metal piece on top another without wanting the weld to show. This could be for various reasons. The part might be small and easily damaged or the weld itself would interfere with the cosmetics of the work. What I am about to show you is a very simply way to do this. But it is quite effective.
Forgive if my pictures are hazy because the camera kept fogging up in the Amazonian humidity we have been experiencing this summer. What you see in the top two pictures is a washer and a 1/8" thick steel square plate. As you might have observed, I want to plae the washer on top the plate in the far left corner. Using a sharpy, I marked three spots where I knew the washer would cover. Then I used a 7/32" titanium nitride drill bit with a little 3 in 1 oil and drilled holes art those three marks.
Next, after polishing drilled plate with grinder, I flipped my assembly upside down, made sure
the placement of the washer is where I wanted it, then I simply filled in th holes with my flux core wire welder. I brought the grinder again and smoothed out the welds and ...PRESTO weld gone! Now it looks as if the washer and the plate are a single piece of metal!

Tuesday, February 1, 2011

Welcome to my offsite blog!

Hello everyone, just wanted to let you know I will attempt to mirror postings from my blog section
of my site http://www.jtbmetaldesigns.com/.  Please visit if you are interested in quality metal decor.